
Drawing a Cretan or Classical Labyrinth
Note: the artist is making a right hand labyrinth, instruction are for a left hand labyrinth.
The method is the same; the difference is the starting point,
which is from the top left hand short angle line to the top long center line.
I love walking a labyrinth, whether in an indoor or outdoor setting. It is one of the best ways to find the stillness within I need to hear the voice of the Divine. But sometimes I am nowhere near a labyrinth, so in that case I will use a finger labyrinth. But I don’t always carry one with you, so, what I do is draw my own labyrinth. Drawing a labyrinth can also be a meditative act, which can be done anywhere or anytime I have a few moments to spare.
I have provided the following instruction for drawing the Classical (or Cretan) Labyrinth, which is the simplest to draw. As you sit down with your paper, take a deep breath to center yourself. Offer a prayer of intention and begin to draw. As you make your seed pattern and connect each of the lines and dots give yourself to the process, letting the growing Labyrinth enter into your prayers and meditation. When you are finished use your finger or pencil too “walk” your labyrinth just as you would with any finger labyrinth. When you have “exited” offer a prayer of thanksgiving and gratitude for these moments of stillness.
Instructions for Drawing Classical (Cretan) Labyrinth
The best way to draw a labyrinth is to begin with a pencil and paper (you might want to include eraser?) We do not know who found it out or invented it, but this method is ingeniously simple and with practice easy to repeat.
It is very important to place your pattern such that you have sufficient space paper for the following steps. Draw the pattern into the lower half of your sheet of paper just slightly left of the center line, making sure you leave enough space on the right and left side and above.
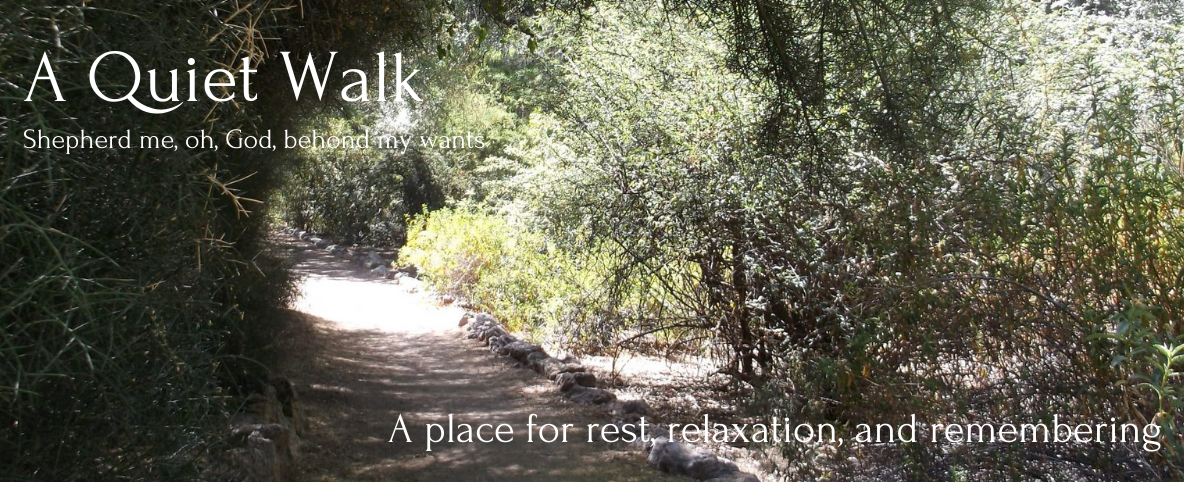
First you draw the basic seed pattern that consists of 4 dots in a square. Inside draw an equal-leg cross. And into each of the 4 small squares resulting I draw a small angle.
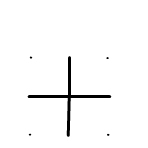
Next you will begin to connect the dots and lines, in sequence, from the left to the right, clockwise all in arc-shaped lines as shown in Fig 3 and Fig. 4


Begin with the middle line (see Fig. 3 above) this is the center.
Now connect the next free end of the line on the left side to the free dot on the right side with an arc equal distant from the first arch (Fig. 4). Continue drawing arcs from left to right. After all of the left side lines and dots have been connected there should be a gap between the bottom left short angle line and the bottom long center line, that is the entrance. Your Labyrinth should look like Fig. 5, if it doesn’t simply start over. Using your finger or a pencil to “walk” your completed Labyrinth.

May your find the stillness within as you walk the labyrinth in it’s many and diverse ways.
Ruth Jewell, ©September 30, 2014

Nice. Thanks. Here’s a page from my spiritual practice Website: http://wellfedspirit.org/labyrinth_pages/seed_pattern.html
Thanks Warren, I need to reference Well Fed Spirit more often because it is one of the best resources out there.